Wednesday, December 22, 2010

Easy Red Sauce

We have been trying to eat at home more often lately which in turn has given me a little boost to try new things in the kitchen. Lately we have been making a lot of home made pizza.


To keep the cost down I decided to look into making red sauce. After looking at many differed recipes online and examining my cupboards, I thought I'd give it a try. It is pretty simple and can be easily converted to spaghetti sauce too.

Pizza Sauce
1 can tomato sauce (plain or whatever kind you like)
2-4 cloves of garlic (or more if you love garlic)
1T olive oil (I use extra virgin)

Combine all ingredients in sauce pan on stove. I use a garlic press for the garlic, but you could chop or used minced if you want. I don't really measure the EVVO, just a quick trip around the pot. I let it simmer for a 5-10 depending on how much time I have. You could go longer if you wanted to I'm sure. Now it's ready. I've kept it in the fridge for a week or so.


Pasta Sauce
4 small or 1 large can of sauce
5-8 cloves of garlic (alter to your garlic preference)
2-3 T olive oil

Additional Ingredients
1-2 t Italian Seasoning
1 t parsley flakes
Salt and pepper to taste
3 T Fresh Parmesan (I graded in some fresh Parmesan last time I did this, but I don't do this all the time. I did like the result though.)

I don't really know exactly how much I used of everything. I just guess and adjust as needed. I've also used some of the flavored tomato sauces instead of the plain. That was good too.


- Posted using BlogPress from my iPhone

Sunday, December 19, 2010

A little something

Most of my sewing will have to wait until after Christmas to share, but here is a little something I've been up to.


I used the tutorial on Sew Mama Sew for the pocket tissue packs. A few of these are going to become gifts for various people, but the penguin one is for me. I don't usually sew for myself this time of year, but these went together pretty fast. The great thing about these is I used fabric from my scrap pile!

- Posted using BlogPress from my iPhone

Monday, November 1, 2010

My Little Harry

I love the way the snitch appears to be flying in this picture.


Did you guess right? I knew as soon as I saw Joel's scar that he had to be Harry Potter this year. I figured I had one more year to pick his costume so why not. I love the way the snitch turned out. I used golden felt and added wings to a basic ball. To get the detail that I wanted, I drew the basic shape and used this technique in a contrasting color to make it stand out.

I knew he wouldn't keep the glasses on so I just used some black felt and elastic to make them. They really look more like a mask then glasses, but that's okay. They were still cute for the 30 seconds he would leave them on. Since I had the snitch I wanted to make the Quidditch robes.

For the robe I bought a men's small tee in the right color and modified it by taking it in the shoulders and shortening the sleeves and bottom. I added the felt in the front to mimic the way the the robes tied in the movies. Overall I liked the illusion that the costume gave. He already had the broom so no extra cost there. His papa helped him find a wand in the back yard, and his costume was complete.


My little seeker catching his snitch

Flying with Mema

Friday, October 22, 2010

Sneak Peak

Can you guess Joel's costume this year based on these clues?


This injury is now a cute little scar.

- Posted using BlogPress from my iPhone

Sunday, September 26, 2010

Sweet Dreams


I've been wanting to use some of Lucas's old t-shirts to make something for Joel for a while now and finally got around to it. I decided to try pjs since they are pretty basic in their construction. I traced a pair he had for the pants. They are a little tighter than I thought they would be, but they will work for pjs. I did have to redo the neck of the top. The first one was too tight in the neck. Hopefully try two fits. To make the pattern I cut apart an old top for the basic shape and went from there. I loosely followed the steps of the 90 minute shirt on Made.


- Posted using BlogPress from my iPhone

Thursday, September 2, 2010

Worm Love

This little gal get to go to her new home this weekend. I wish I could be there is person to give her to my niece even if it is a very belated birthday gift. Next year I plan to be more on top of things.


There is a patten out there somewhere for this snake/worm, but I can't remember who makes it. Joel has one that I got at a craft fair last year, and I just make up my own pattern based on his. I basically made a tube and rounded the ends. I left an opening at one of the sections to stuff her, and then hand stitched it closed. Next I embroidered the eyes and a little mouth (not pictured). I added some extra detail to the back with the little heart. I felt it was fitting for the personality that was coming through with fabrics. Enjoy your new friend, Annie!

Sunday, August 15, 2010

New Wardrobe


If only I could make myself a new wardrobe as easily as I did for my niece. Her birthday is coming up so I recycled some old clothing of mine and raided my fabric stash to make some new closes for her American Girl doll. I used Simplicity pattens 7083 and 4297 for my basics.


I wanted to tie the shirt and pants into the sweater I made so I added some green daisies to spruce them up a little. I think the hoodie is pretty cute. I made it out of an old sweater of mine that had a stain on the front. Kalena happens to love purple. I thought the polka dots were cute. I love that they also had the same shade of green. Don't you love it when things work out that way.

Sunday, July 11, 2010

Frozen Lemon-Ginger Yogurt


The other day I was looking for a recipe that used some leftover buttermilk that I had. I was looking through the recipes at Epicurious and came across this one for Lemon-Ginger frozen yogurt. They also have a cool app for the Iphone/pod if you are interested. I'd always been interested in using fresh ginger and thought that it sounded delicious. After reading the reviews I decided to use Greek yogurt to give it the tang. (One of my favorite treats right now is the tart frozen yogurt.) I enjoyed the finished product. After the initial shock of the tart my son enjoyed it too.


Monday, July 5, 2010

My Weakness

I'm a sucker for pomegranate. If you put it on the label, there is a good chance I'll buy it at least once. My latest pomegranate impulse buy was this gum.


It not too bad. My normal gum choice is something with mint. However, if I'm ever craving berry, I would consider this again. I'm not sure it has a strong pomegranate taste, but good none the less.

- Posted using BlogPress from my iPhone

Saturday, July 3, 2010

Grandma Camp!

I have the best parents in the world. Every summer my mother hosts a week long Grandma Camp for the grandkids. Yes, a whole week with just the kids. This year we decided to do it in shifts with an overlapping weekend for the grandkids (and kids.)


To celebrate I decided to make shirts for the grandkids. I wish I'd thought ahead and made one for Grandma too, but there is always next year. I originally was planning to use freezer paper to stencil the words and design. I jumped on the computer and played around with some ideas in PowerPoint until I created something I liked. First I came up with the saying. I kept playing around with the idea of Hanging Around with Grandma, but ended up settling on Monkeying Around at Grandma Camp. After choosing the idea of a monkey, I looked at different clipart. While looking at them, I decided to applique the face of the monkey in the middle of each shirt. I knew I would need some brown and tan knit. When Hobby Lobby didn't have any tan, I thought I would try Savers. I could always use the rest of the fabric for a future project. So I bought two t-shirt in the right colors to cut up. Thank goodness that Savers is color coordinated. Next I scoured Walmart to find the shirts. I wasn't able to find ones that I like for all the kids so I dyed white ones instead. While at Hobby Lobby I did pick up some dye just in case. I like how the color turned out slightly variegated. I didn't stir constantly so the dye soaked in differently across the fabric. (It is hard to tell in the picture, but trust me it's cute.)


The one and two year olds have matching plain t-shirts. For the almost five year old I bought a single shirt with a little more detailing. The top is a little gathered giving it a feminine feel. I was not getting the look I wanted with the freezer paper for the letters so I choose to embroider the words instead. This also allowed me to curve the letters around the face of the monkey. I think they were a big hit!


The kids all wore them to the animal park. It did rain on us while we were there, but who lets a little rain ruin their fun? I think the rain was Joel's favorite part.


Now I just have to figure out next year's shirt. Any good ideas?

Saturday, May 22, 2010

I love free stuff! update

So a while ago I signed up to be a Buzz agent. Basically they send you products for you to try and then you just talk about them. Well I joined my first campaign and was really excited because it was a product that I'd been looking at already. The only reason that I hadn't bought it already was because I already had eye shadow at home, and I kept talking myself out of it. For once procrastination paid off.

Overall I like the eye shadow. It is fast to apply, and even the first time I liked the results. I was a little worried that it would be too bold for everyday wear, but was pleasantly surprised to find that it was just fine. The only thing that I don't like is sometimes I get a build-up in my eyelid crease, but that is easy enough to fix.

Here is the best shot I have when wearing the eye shadow and gloss. I know it's not great, but it's what you get.

Thursday, May 6, 2010

I love free stuff!

My first bzz agent campaign arrived today! More info to come later.


- Posted using BlogPress from my iPhone

Wednesday, May 5, 2010

If you like this top you should check out this awsome giveaway at Dear Lillie. She has a lot of really cute stuff in her Etsy store.

Saturday, April 24, 2010

Blessing

A few months ago we attended an event at our church designed to help families make their homes the first place their kids are exposed to God. Every age has a different theme. Since we have a one year old, that's the one we went to. The topic was praying blessings over your children. One suggestion they had was framing one and putting it close to your child's bed. I liked the idea, but didn't want to use paper so I embroidered one of my favorites on a linen like fabric.


To start with I printed the verse off on the computer in a font I liked. Then I added the embelishments. Since the verse was about not being afraid, I went with the moon and stars. Next I traced it on to the fabric with carbon paper and a knitting needle. Since it was such a dark fabric I ended up going over the lines with a fabric marker. I think I maybe should have used a brighter contrast for the blue thread, but overall I like the way it came out.


- Posted using BlogPress from my iPhone

Thursday, April 15, 2010

Treasure Hunter

A few days ago my husband and I went to Savers. I'd been intrigued by it since it opened, but I had never made it in. I was really impressed with the organization and cleanliness of the store. We didn't end up getting anything for ourselves, but we did find some great buys for Joel.

Here are my favorite finds.

This is why.


Here is his dad's favorite.


Saturday, March 20, 2010

First Day of Spring!


You have to love Kansas. (Daffodils courtsey of my sister.)

- Posted using BlogPress from my iPhone

Saturday, March 13, 2010

Silver Lining

When you're up at 7:00 in the morning on a Saturday, you can do this.


- Posted using BlogPress from my iPhone

Tuesday, March 9, 2010

Flower Garden

When browsing the many wonderful blogs during celebrate the boy month I came across this tutorial for a dress for a newborn at This Mama Makes Stuff. I happened to have some fabric that I'd been wanting to make up. I just wasn't sure what I wanted to make. After looking through my stash I also found the ribbon and infant shirt. When I finished I thought if needed a little something more so I added the pink around the collar with embroidery floss.

Sorry the pics are a little dark, but you get the idea.


The dress is a present for one of Lucas's friends. It will be their first girl after four boys and 16 years later. So I thought a little frill was in order.

- Posted using BlogPress from my iPhone

Sunday, February 21, 2010

Can you tell me the time?

I don't know if you're aware but Made by Rae and Made are hosting a month all about crafting for boys! (buttons below)I've been getting all kinds of great ideas and finding some wonderful new blogs to read. I haven't made that much time for sewing lately, but when I saw these cute felt watches I had to give them a try. Not to bad for a first attempt.


I modified them a little by taking the buttons off. I didn't want Joel to bite them off and choke.

Action shot below.


- Posted using BlogPress from my iPhone (and then modified on my laptop)


Sunday, January 10, 2010

Coffee Please

For Christmas my sister gave me this very cute camera case and coffee sleeve.


Ever since I've wanted to use some of my scraps and make some more coffee sleeves. In November the blog Sew Mama Sew featured tons of projects. One of the techniques was thread stiching by clutterpunk. I thought this would be a good project to try it out.


Saturday, January 9, 2010

Name Change

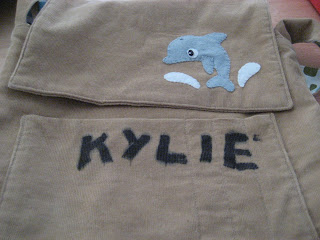
I made a messenger bag for one of my nieces for Christmas and it turned out so cute I decided to make another one for my other niece. She is a big fan of dolphins so I wanted to appliqué a dolphin on the front flap.


Here is the detail on the dolphin. I used felt and embroidery floss to attach it. Felt is one of the materials I've been experimenting with lately. I was really pleased with the way it came out.


You may recognize the corduroy for the bag from the roof to the doll house below. I had just enough left to make this bag. In fact I had to get creative in the way I made the strap by piecing the parts together in a way that it would not look odd. I extended the middle by putting a strip that ran against the grain of the rest. You may be wondering why I'm sharing just how little of the main fabric I had left. Disaster struck on the night I gave the bag. I love my husbands grandparent, but I forgot about an important character trait of his grandfather. He puts his name on everything and feels that everyone else should too. Before I knew what was happening he had convinced my niece that her name should be put inside the bag in permanent marker. I didn't know how to stop it. After all it was not my bag anymore.


Needless to say Kylie was not thrilled with the execution of the labeling of her bag. To her credit she did not let it show in front of grandpa. I was trying to come up with a way of fixing the bag. Like I said I had no more fabric to make a new pocket, and I was not thrilled with the idea of taking the entire bag apart to redo the pocket as it's the first step in the process. I decided to add some additional felt appliqué. After embroidering her name and a few water drops so it would be wide enough to cover the original name I attached a large piece of felt across the marker. Much improved if I say so myself. This way she was able to keep the pocket and still have a stylish bag.


I also made a bad for my nephew, but his was more military style with a helicopter painted on the front. His dad jumps out of Blackhawks in the military so I thought he would like that. The name did not look as out of place on his bag so his mom and I decided to leave it. Sorry no picture. Somehow I forgot to take one.